My Pinterest Strategy Journey Part 3: How to Create Pins
Welcome back to part three of my Pinterest strategy journey. This week, we’re exploring how to create pins. Finally, right?! We’re three articles deep and we haven’t even begun posting on Pinterest yet.
But that’s okay! I’m a planner, and all of this groundwork is going to help you get ahead!
In this part of the journey, we’re going to focus on three important things:
Let’s get down to it.
If you're new here...
Hey there! Welcome! My name is Clare, I’m the author-publisher behind the young adult science fiction & fantasy publisher, Faery Ink Press.
Each month I blog about a specific behind-the-scenes project or campaign I carry out on my very real publishing company—and share all the messy feelings and results with you, the creative reader.
My Pinterest Starting Point
So I realized when I sat down to write this article that I haven’t really made clear where I’m starting from, other than from a cobwebbed account.
When I got serious about my Pinterest account in August 2020 and started pinning at the end of September 2020, here were the notable stats, facts, and figures:
- 168 monthly viewers*
- Zero web traffic. Didn’t even register on my analytics, except, very, very rarely, and certainly not because of anything I was Pinning.
- Single digit (or very low double digit) impressions on existing Pins. All that was there of import were my book covers and maybe some very early attempts to be Pinterest-y…but, nothing substantial to write home about.
- 30 followers, 6 following. Since I started, Pinterest has made a shift to encouraging creators to engage more on the platform. Pinterest followers used to be more of a irrelevant metric, though now that may be changing. The follower count doesn’t mean much to me at this point in the journey, but it may become important later.
- I hadn’t Pinned in years and years. The last time I’d logged in was…maybe 2-3 years prior?
*In January 2021, Pinterest changed this metric to monthly VIEWS.
Basically, I’m starting at zero, with the bonus that my account is old.
As a reminder: my goals for this Pinterest journey are...
Make Pinterest a top social traffic driver for my website.
I want people to discover me on the platform and take the next step (visit my website, join my newsletter, check out my podcast, check out my books, etc).
Reach 1M monthly views on the account.
This is TOTALLY a vanity metric – but it would be really neat, wouldn’t it?! And, who knows how many outbound clicks that would result. When I get there, I’ll tell you! 🙂
Stick with an alternating but dedicated strategy for 1+ years.
I really want to know if there is a "long game" to Pinterest. In general, this is a goal for all my social campaigns.
Getting started: Creating Content for Pinterest
Everyone has to start somewhere. So I opened an Excel spreadsheet and started making a plan.
(You’ll notice if you’re a dedicated reader that making a plan is always the first step!)
There were three things I did in my spreadsheet that helped me stay the course with my Pinterest planning: keyword research, generating Board ideas, and figuring out WHAT Pins to create first.
Copyright Clare C. Marshall
Keyword Research
Remember when I said that Pinterest is a visual search engine? Just like with SEO (search engine optimization) for blog posts and for your website, you have to do keyword research for your Pins! You can do this in Pinterest’s search bar.
Type in any generic term and you may see more specific suggestions along the top. Take note of those!

In the above screenshot, I've typed in "YA fantasy books" into Pinterest and it's given me additional keyword suggestions, such as "best", "quotes", "covers", "recommendations", "standalone", "to read", etc.
That means "YA fantasy books" is a keyword, but so is "YA fantasy book recommendations" and "best YA fantasy books."
I wrote down all the keywords I could think of in my Excel spreadsheet, tested them in Pinterest to see what they gave me, and then wrote down Pinterest’s suggestions as well.
This isn’t the most fun part of being an online marketer. But don’t skip this step, even if you think it’s boring or unnecessary. You’ll need it later.
How to Create Pinterest Board Name Ideas
Before I started creating Boards willy-nilly, I generated ideas in my spreadsheet first.
This was really tough at first! I mean, it’s not HARD to create Boards. They’re just categories of THINGS, after all.
But…I wanted them to be GOOD categories. They had to be right.
I had to shift my thinking to wrap my brain around this. I thought: how do I categorize my books? How would OTHER people categorize them?
This is why keyword research is important. You want your Boards to be relevant to what people are searching for within your niche.
Like I touched on in part two, I ended up with general Board idea names: “YA Science Fiction books” and “Beautiful Book Flatlays” as well as specific Boards: “The Violet Fox Series.” I also planned to create Boards for each book.

An example of some of my Pinterest Board ideas. Yellow highlighted Board names are ones I had created at the time of screenshoting.
The annoying voice inside...
Honestly, this whole process was really strange for me. I have a big voice in my head that says, “WHO CARES?!” about a lot of this. Who cares about my stupid Boards, who cares about how I’m organizing my Pins, who cares about why I’m doing this at all? I had to fight that voice and crawl through the noise while completing this whole planning stage.
Just know that, even if it feels silly, these steps are important. They are small, they are nitty-gritty, but they’re just one thing in a thousand you’re going to do to complete your ultimate book marketing goals.
If this is overwhelming for you, just remember: you don’t have to make all your Boards at once! You only have to make Boards for the Pins you’re going to start with (see below). This might be 5-10 Boards, if that.
Don’t be afraid to start off slow.
As you can see in this screenshot – I created two brand new Boards to start, and made others as I went. I also made old Boards private or straight-out deleted them. Over the course of a couple of weeks, I cleaned up my Boards and profile as I created my Pins and nailed down my strategy.
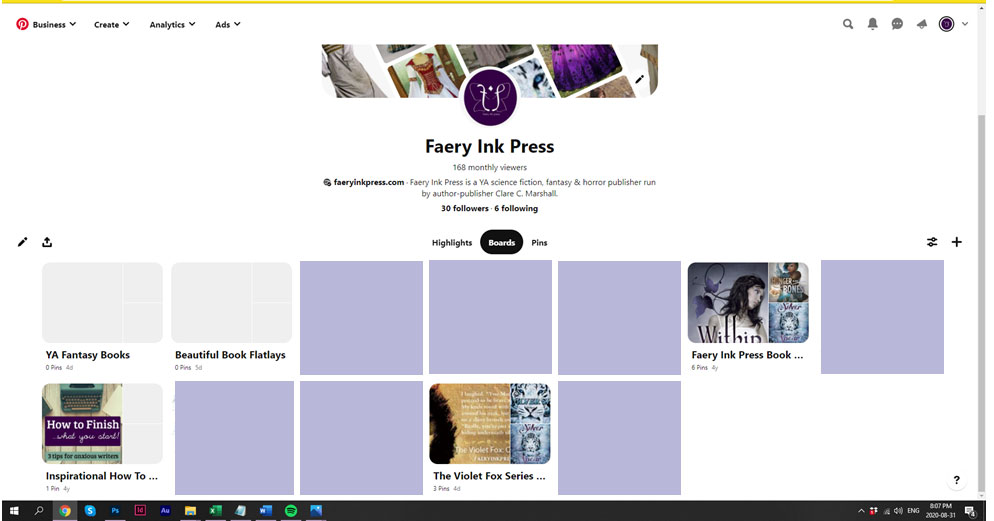
A screenshot of Faery Ink Press's Pinterest account just as I started employing my Pinterest strategy. There are some empty Boards and three Boards with some old Pins (mostly book covers). A few really old, personal Boards have been hidden by purple blocks.
Like, even looking back at this picture, 6+ months later, I see how far I’ve come. I want that for you too.
Copyright Clare C. Marshall
Pin Creation Plan
Because I was so overwhelmed with this process, I told myself: “Okay. Let’s just pick a couple of categories, pages, or products to create pins for, and then we can go from there.”
Initially, I chose my science fiction series, my free eBook download, the first book in my science fiction series, the quiz on my site that helps people narrow down what they might like to read, and my fantasy serial podcast. Each of these has separate URLs that I could create pins for.
If you’re in the same boat I am, where you’re NOT sure what to create Pins for? Choose the top 3-5 most popular of the following:
Start with what is popular for your audience – or if you’re just starting, choose 2-3 things you want to promote most right now.
And then…let the pin creation begin!
How to Create Pins
There is a LOT of information out there on how to create pins for Pinterest. I’m not going to get super technical here, as there are multiple ways to create Pins. I’ll just talk generally on how I create them with the tools I have.
Summary
Copyright Clare C. Marshall
Crafting an Effective Pin Design
So…sure. You can Pin your book covers and call it a day.
Or…you can do something different.
Now, you can use a service like Canva – an online graphic creator tool – to create your pins. But hey, why use Canva when I have the entire Adobe Suite, right? (Hahaha so much money this is fine I literally use it every day of my liiiiife)
I was ecstatic to actually be able to RE-USE the beautiful shots I had taken for my Facebook and Instagram posts. Here, on Pinterest, they could live on FOREVER instead of being forgotten after three days.
As Pinterest is all about inspiration and discovery, you want to show up with the very best photos of your books (or whatever you’re selling!). My photo quality varied at first. I’d just upgraded my phone, and now had access to a better camera (without bugging my husband for his fancy-dancy rig), so my Pin quality DOES increase as time goes on.
You don’t want to complicate your Pin design. People should be able to look at it and say, “ooooo” and get it without too much investigation. This should be an aspirational target when you start designing your Pins.
At this point in the game, I was focussed on getting Pins up and out the door. I looked at what URLs I wanted to promote and created content for that – nothing more, nothing less.
Creating Pin Templates
If you take a look at my pins, you’ll see some of them look VERY similar. That’s because I designed a template and swapped out the text/images for easy pin creation. I did this in Photoshop but you can do it in Canva as well (apparently – don’t ask me about this because this is where my knowledge stops).
Some examples of the templates I had were:
- logo at the top and website at the bottom (simple, picture only)
- Book description/tagline at the top, picture at the bottom
- Picture at the top, tagline at the bottom.
You get the idea.
But which Pins worked the best??
We’ll explore this a little later, as it’s not something I can pass judgement on at this point in the story.
It takes time to figure out if a) the Pin is resonating with your audience and b) if you’re even targeting your audience correctly in the first place. This is why creating a lot of (targeted) spaghetti, linguini, and fusilli and throwing it at your Board is useful, in that you’re going to gather data about what works and what doesn’t.
What’s KEY here is: I allowed myself to create imperfectly just so I could get it done.
If you compare what I was pinning then to what I’m pinning now, you may notice a difference. But back in mid-late 2020, I just wanted to get started. And getting started is one of the HARDEST PARTS.
So, at this point in the game?
Do some research about what makes a nice Pin, look at what other, similar accounts are doing, use a tool that works for you, and get creating.
We will refine our Pin creation later, once we have some data under our belts.
Sound good?
Video Pins??
Yes, you can post video Pins! Some resounding advice sprinkled about my time researching Pinterest was: “Video Pins perform better than static Pins!”
“Hmm, do they?” I asked.
So I made a couple video Pins for the queue as well. These were considerably more work. My video Pins focussed around Wingtorn (my fantasy serial podcast!), sharing little fifteen second clips from the show with the theme music in the background.
I had already done a few of these for my Instagram feed so I could re-use the clips, but resizing and re-exporting the mp4 was a bit of a pain.
“It’s fine,” I told myself. “These Pins will live forever.”
Story Pins??
When I started investing in a Pinterest strategy back in August and September 2020, Story Pins were not available in Canada. Now, at the time of writing, they’re in beta. Don’t worry, I’m going to touch on them, but we’re not there yet in the story. ^^
Putting it all together: Starting the Pinning Process
As I dedicated a bit of time each day to creating enough pins to get me started, I also started creating Boards.
I’d been warned that a sudden surge in activity on your Pinterest account could be “suspicious” to Pinterest. I don’t know if that’s actually true, but hey, I’m the cautious sort. Every couple of days, I’d make a small change to my Pinterest account. Make an old Board private one day. Create a fresh new Board another day. Optimize some old Pins a couple of days later.
You know, going it slow like this was kind of therapeutic. I didn’t have a lot of pressure to SUDDENLY MAKE MY ACCOUNT PERFECT. A little tidying every day can go a long way. I knew it wasn’t performing how I wanted right now, but I kept picturing the account six months, a year in the future, and how I’d be raking in the clicks and impressions.
(LOL! Spoiler alert…well, kind of? I’ll get there, I promise.)
You can use Tailwind to schedule out your Pins, but since I was just getting started, I opted to schedule them natively within the account itself until I had the hang of things. At the time of writing, you can only schedule two weeks out natively within Pinterest. This was disappointing to me as I was used to doing thirty days with Instagram and Facebook. At this point, I had thirty to forty days of Pins saved up.
Uploading and Publishing to Pinterest
The moment had arrived! After devoting time week to creating Pins, finally at the end of September, I'd built up a library of Pins and I was ready to schedule them!
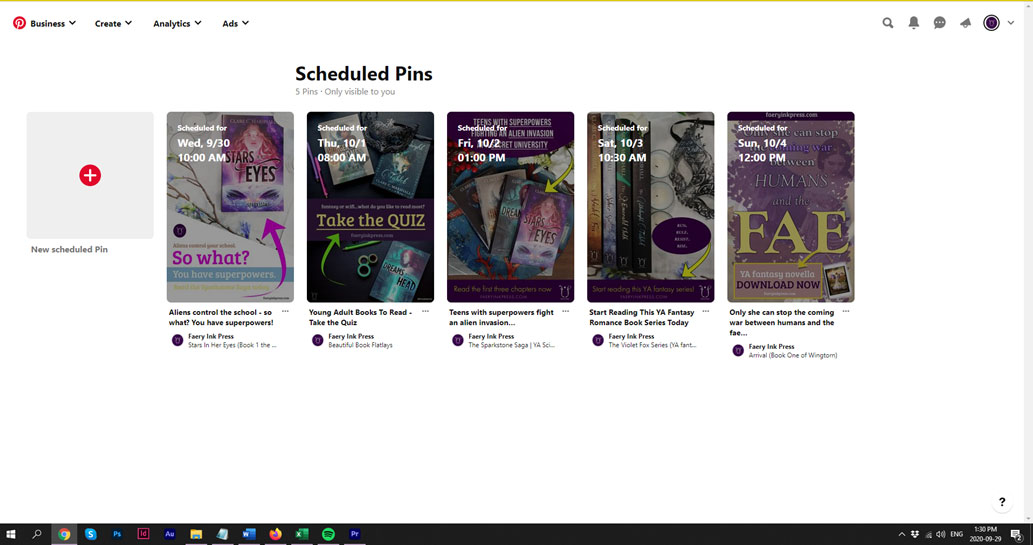
A screenshot of my first scheduled Pins. There are five of them. Yayy!!
To upload Pins within Pinterest, it’s super simple. Go to “Create Pin” and then you can drag-and-drop your image, create a title, add a description, and a link, and specify when you’d like to publish the pin – and to what Board.
At that point you can publish or schedule them.
When you first publish a Pin, you can only choose ONE Board. It’s only when you re-pin (or save) it that you can put it on a different Board. I hope that makes sense.
Ideally, you want to choose the most relevant (or most popular Board that’s relevant) for your initial pinning. This was tricky at first, since all my Boards were new and I was literally just throwing spaghetti at the wall.
I also wanted to diversify my Pins: each Pin going out needed to be pointing to a different URL, going on a different Board, and ideally look different than the Pin that had published the day before.
Are you following me, here?
Mostly, I wanted to show Pinterest, “Hey, look at me, I’m not just a one-trick pony, I’ve got lots of different places for my audience to go, I’ve got different looks, and different things for everyone to look at. Cool? Cool!”
I kept track of all of this in my handy-dandy Excel spreadsheet.
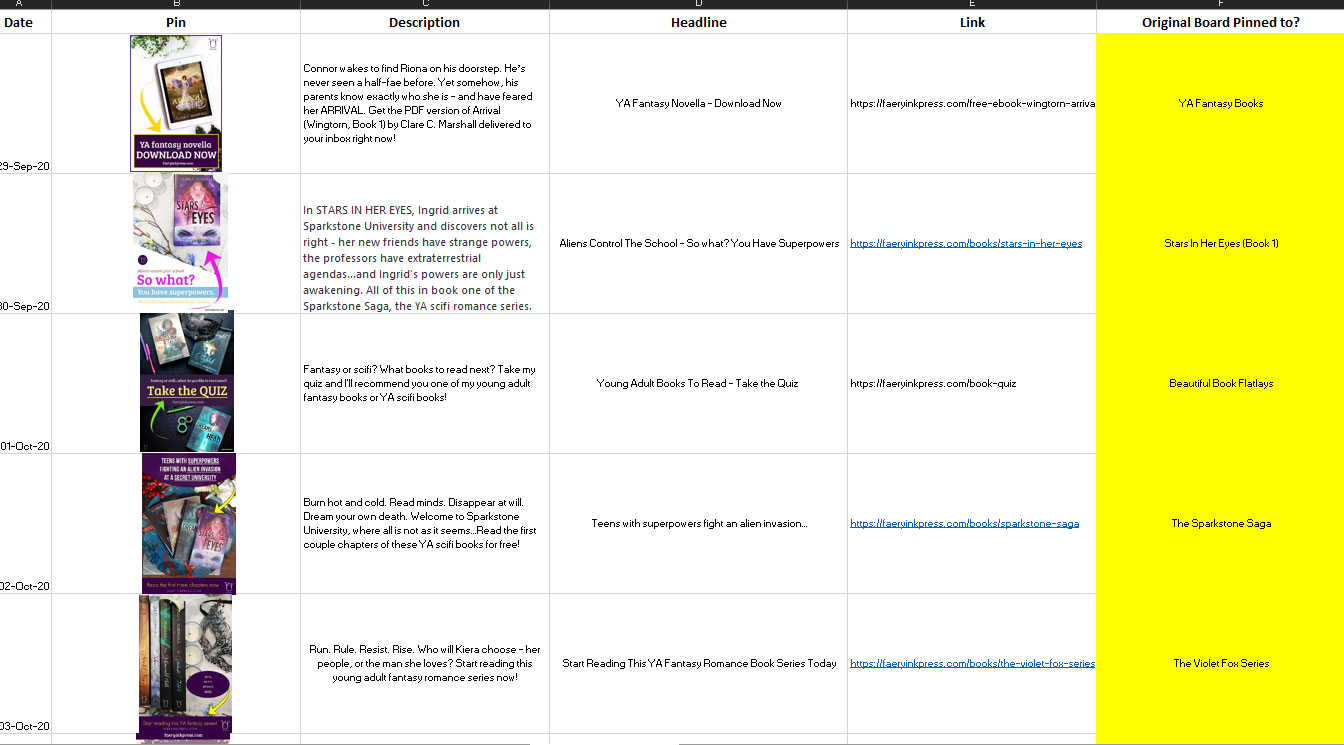
An Excel spreadsheet - this is how I keep track of all my Pins.
Honestly, at this point in time, I didn’t spend a LOT of time pouring over my titles and descriptions, beyond ensuring that an appropriate keyword was in the title and/or the description body, and I was writing something coherent about what I was promoting. I really, really wanted to get to the part where Pinterest was driving a lot of traffic for me.
Be Pin Patient
Remember when I said Pinterest is a long game? Yeah. Don’t get discouraged if you start Pinning and nothing happens.
Pinterest is a lot like gardening. You plant your seeds, you take time each day to water them, and eventually, something will grow. And if nothing grows, you go back to square one and try different seeds, different soil, maybe you need to put it in a warmer part of the house, you know?

A screenshot of my Pinterest account, with scheduled Pins ready to go, and one Pin having already been posted. There are a few other Pins, mostly my book covers.
Next time…
So what happened next? Am I Pinterest expert now?! Did my Pinterest account explode and now I’m a very famous author?!
Haha!
Tune in next time as we’ll explore…
- Pinterest trends!
- How my hard work started to pay off (a little!)
- What happened when I STOPPED pinning!
Let me know in the comments what marketing strategy you’re exploring right now.
See you next time! 🙂
